In this article I explain the important principles in metrology and measurement systems analysis (MSA). Metrology is the science of measurement and is important in areas such as science, manufacturing and trade. Metrology enables us to know the accuracy of measurements and to ensure common standards are used. In science this means we know whether an experiment actually proves what it appears to prove or whether the result could be due to inaccuracy in a measurement. In manufacturing it means we can make parts which fit together and perform as they were designed to. In trade it means we know how much of something we are actually buying. I also briefly introduce MSA and talk about how it relates to metrology.
The metrology principles introduced on this page include:
- Uncertainty of measurements
- Confidence in measurements
- Calibration and traceability
- Measurement systems analysis (MSA)
- Decision rules
This page is the first part of a series of pages explaining the science of good measurement. It is followed by Part 2: Uncertainty of Measurement, Part 3: Uncertainty Budgets, Part 4: MSA and Gage R&R and Part 5: Uncertainty Evaluation using MSA Tools.
Uncertainty of Measurement
The first thing you should understand about metrology is that no measurement is exact or certain. If I was to show you a bolt and ask how long it is you might say, “It’s about 100 mm”. The use of the word about implies there is some uncertainty in your estimate.
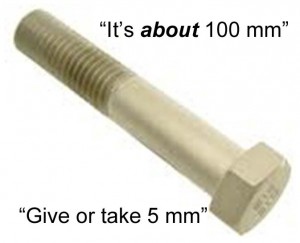
All measurements have uncertainty; a measurement is in fact just an estimate, it might be a much better estimate than the one you can make just by looking at something, but a measurement can never tell you the exact value. In metrology we must always consider this uncertainty when making a measurement.
Confidence in Measurements
Related to uncertainty is the concept of confidence. Thinking again about looking at a bolt and estimating the length, we might say “it’s about 100 mm give or take 5 mm”. This is assigning limits to our uncertainty. We would be more confident in saying that the bolt is 100 mm plus or minus 10 mm than we would be in saying it is within 5 mm. The larger the range of uncertainty we assign, the higher our confidence becomes that it encompasses the “true” value. I could look at the bolt and say I’m 70% sure that it’s 100 mm give or take 5 mm and 90% sure that it is within +/- 10 mm. The uncertainty of my estimate is +/- 10 mm at a confidence level of 90%.
In metrology we must be very clear about the level of our uncertainty at a given confidence level. We can carry out an uncertainty evaluation which includes analysis and experiments to determine the uncertainty of a measurement. Most uncertainties follow the normal distribution. For a normal distribution we would have a 67% confidence the true value is within 1 standard deviation of the measured value, a 95% confidence it is within 2 standard deviations and a 99.7% confidence it is within 3 standard deviations. Standard deviations and the normal distribution are explained in detail in Part 2: Uncertainty of Measurement.
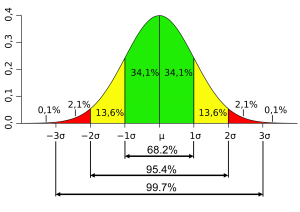
The larger the range of uncertainty we assign, the higher our confidence becomes that it encompasses the “true” value.
Calibration and Traceability in Metrology
It is very important that we are all using the same standards of measurement around the world. When parts are manufactured the machines are set and the finished parts are checked using measurements. By using the same standards of measurement we know that a nut made in China will fit to a bolt made in the USA. Calibration is the way that the standards are transferred from one country to another, and from one instrument to another. The primary reference standards for the SI units of measurement are held in France and each country compares their national standards against these. Calibration lab’s compare their standards against the national standards and then use these to calibrate instruments.
Calibration simply means comparing one measurement with another. For example when a ruler is made it might be compared with a reference ruler to determine where the markings are positioned. This is a simple calibration. The markings will not be at exactly the same positions as the ones on the reference ruler; there will be some uncertainty in the calibration process. The reference ruler itself will also not have markings at exactly the right positions since there was some uncertainty when it was calibrated. The ruler has uncertainty from both the reference standard used to calibrate it and from the calibration process, therefore an instrument must always have a greater uncertainty than the instrument which was used to calibrate it. When an instrument is calibrated the uncertainty of the calibration should always be evaluated.
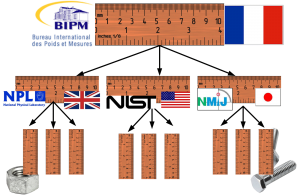
A traceable measurement is one which has an unbroken chain of calibrations going back to the primary reference standard, with uncertainties calculated for each calibration. Uncertainty of measurement is inherited down the chain of calibrations so that uncertainty increases the further we get from the primary reference standard. Traceability from the primary reference, through accredited metrology laboratories and on to industrial metrology departments ensures that we are all working to common standards and know the uncertainty of measurements.
Measurement systems analysis (MSA)
Measurement systems analysis (MSA) is an alternative approach which seeks to quantify the ‘accuracy‘ of measurements, this is equivalent to evaluating the uncertainty of measurements but there are some key differences which are explained in detail later.
Accuracy, precision and trueness
Within MSA accuracy is defined as the sum of trueness and precision. Trueness, also referred to as ‘bias’, is the difference between the mean of many measurements and the reference value. Precision describes how closely repeated measurements of the same quantity show the same results.


Gage Repeatability and Reproducibility
Repeatability and reproducibility are two measures of precision. Repeatability measures how the results of a measurement vary when the measurement is repeated under the same conditions and within a short period of time. Reproducibility measures how the results of a measurement vary when the measurement is repeated under changed conditions and over long periods of time. Gage Repeatability and Reproducibility (Gage R&R) studies are experiments in which different quantities are each measured multiple times by different operators in order to understand the precision of a measurement process. This is be explained in detail over the next pages.
Decision Rules for Proving Conformance
If measurements are uncertain how can they prove anything? For example does a measurement prove that a part is out of tolerance? There are some simple rules which allow us to state, at a given statistical confidence level, whether a measurement proves or disproves conformance. It is also possible that the result may be inconclusive in which case we may wish to make further measurements with reduced uncertainty.
The tolerance for a dimension defines an upper specification limit (USL) and a lower specification limit (LSL). For example if a dimension is specified as 10 mm +/- 0.1 mm then the USL is 10.1 mm and the LSL is 9.9 mm. In order to prove conformance, at a given confidence level, we must add the expanded uncertainty (U), at that confidence level, to the LSL and subtract the expanded uncertainty from the USL.

In the next section I will explain a bit more about uncertainty of measurement introducing types of uncertainty and the principles which must be understood to evaluate uncertainty.