Go back to:-
Straight edges and flat surfaces, like angles, can be derived from the principles of geometry and do not require any reference standard. This area of dimensional measurement is very important in the construction of machines and instruments. For example a flat surface can be produced by lapping three surfaces together. Lapping basically means to rub together. The first two surfaces are rubbed together to create smooth surfaces, it is however possible for one of these to be concave and the other convex as shown below. When the third surface is then lapped against the second the curvature may then be transferred to this third surface. However when the third combination of two surfaces are lapped together this will remove any curvature and produce a flat surface. This process is iterated until the required flatness is achieved.

Industrially produced straight edges and flat surfaces are of course generally not produced by lapping three surfaces together. This would be far too time-consuming. Machine tools are built so that they have a number of straight axes which are perpendicular to each other. As part of the traditional machine building and calibration process these axes would be compared to straight edges and flat surfaces. These references would be produced using a lapping process. It could therefore be said that there was a traceability chain for flatness with the lapping of three surfaces together being the primary reference standard.
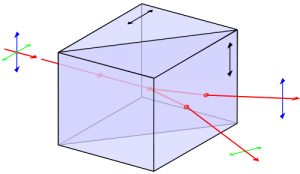
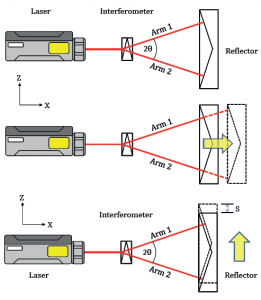
Increasingly machines are now calibrated using laser interferometers as the reference for straightness. For example an unpolarized laser source can be split into two orthogonally polarized beams using a Wollaston prism. Each of these beams can then be directed to an angled reflector so that it is returned along the same path. Any movement of the reflector perpendicular to the direction of the original beam will then result in a change in the relative path length of the two beams. This can be detected by a fringe counting interferometer.


Read more about:-
- Metrology introducing the concepts of uncertainty, traceability and confidence, and explaining how this allows us to prove, with known statistical confidence, whether or not something conforms to a specification.
- An introduction to evaluating uncertainty of measurement.